I made up a QLD layout for camp and offered it as a preorder.
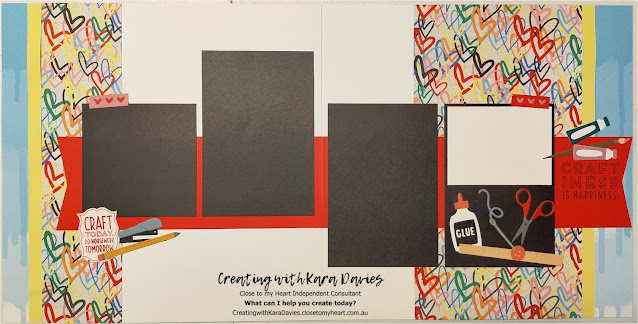
I also made up this Craftiness is Happiness layout and offered it as a preorder.
Friday afternoon, we packed up my goods and headed over to the venue to set it up to our liking.
One of my customers runs, owns, operates, and manages a string of childcare centers in the area. She graciously allows us use of the Kindy Room for our weekend events. We call it Adult Day Care.

We had a lot of very concerned and curious little noses pressed against the windows watching us. They kept asking their caregivers "what are they doing!?" We moved it all around so we can set up our tables and chairs to fit our needs. I ended up with an L-shape of tables and it worked out really well!
For our regular retreats, we do a welcome project name tag on the first night. Since this was a 2 day camp, we did these after morning tea on Saturday. I also had our 2022 Virtual Convention happening this weekend. In my box of Convention goodies, Sticky Girl was a stowaway! I put her to work with jumping on our name tags.
Some ladies stamped her in Cinnamon and decked her out in a variety of Queensland maroon and gold. Others went the Carolina route and turned her into a NSW blue!
For morning tea, I made a fresh batch of lemonade scones with strawberry jam and vanilla cream. They were devoured!
I saw a sale on vistaprint a few weeks back for custom mugs. I ordered one for the four of us in our appropriate colors. #IYKYK
Unless yo face is on my mug, you don't get to use it!
We set up our full shop of goodies along one wall for the ladies to shop as they wished throughout the weekend.
The kindy room has a microwave and fridge to use. We bring a kettle and poof, we have all the catering facilities we could possibly need!
The campers in full swing getting their tables sorted out and projects started. We love Sleep at Home Camps! We get a table to ourselves and all the fun of a regular camp, yet we get the comfort of our own beds at night. It's also drastically cheaper for all involved so we try to hold at least one a year.
After doing the scones and nametags, I had a chance to get my own projects started. I had a layout kit preorder to put together and some more thin cuts to use for another kit.
I used the Slim Alphabet Thin Cuts to cut out my title from Kraft and Black cardstocks. Pro tip: back your cardstock with our new Adhesive Sheets first, then run through your diecutting machine.
Since I forgot my adhesive sheets, I went the more fiddly and time consuming direction... using tweezers and liquid glue.
This turned out better than I thought it would!
I set my Black letters down first on wonky angles, then the Kraft letters on top to create a drop shadow effect.
When the Fresh Paint paper has so many colors in it, a drop shadow is the best way to make your title stand out.
Since this is a Sleep at Home Camp, we order in pizza for dinner. A quick look through the Domino's menu showed mini pizzas available. I ordered a mini Three Meats for my dinner. After dinner, we had a white chocolate and raspberry GF blondie for dessert and kept crafting til 10pm before heading home to get some sleep.
We got up and arrived at the venue all set to start again at 9am. Our ferocious taskmaster Matilda the cleft Moodle kept us all amused with her explorations and antics. She's a cleft puppy being cared for by her vet nurse (one of my customers) and came to craft with us. It was a big weekend full of new sights, sniffs, cuddles, naps, feeds, and more. We wore her out! Once she's big enough for her cleft surgery and recovered, I believe she'll be available for adoption.
 | |
| Honestly, how do they expect us to work in these conditions?! |
 |
| It's tough work being a puppy! |
I double thin cut my title for this layout too. I opted for the Block Alphabet Thin Cuts with a White Daisy top layer this time.
A bit before lunch we had a little State of the Union announcement session. We shared about the new products coming, the big price increases on some items, and maybe a sneak peek at some new goodies.
I got back into my own crafting and made these layouts. Since 2 of my most used pocket scrapbooking page designs are being discontinued, I'm making layouts to use as fillers in my albums.
This one is a sketch from Scrapbook Generation. I bought a digital download of theirs years ago and keep forgetting to check it when I need ideas. I'm pleased with how it turned out!
The weekend came to an end, we all packed up our own goodies, packed up our shop, put the tables and chairs away, and put the room back to how it was. We'll be back in a couple weeks for our July 16 Craft Day. Wanna come? Book your spot here!
Products used on these projects: Trimmer Versamat Tweezers Papercrafting Tool Scissors, Adhesive Runner Glue Pen LePen, Cardstocks Fresh Paint Paper Packet, Block Alphabet Slim Alphabet and Crafting Shapes Thin Cuts, Cinnamon Black and Carolina Inks Blocks, MIFYHv5, Dark Red and Light Yellow Triblends, Gold Glitter Gems, and Cassidy Alphabet stampset.


No comments:
Post a Comment
All comments must be approved before they are visible. Abusive comments or spam of any sort are not allowed.