Showing posts with label FunDay. Show all posts

Tuesday, January 20, 2015

January Fun Day

12 solid hours of aircon, 1 crowded slightly noisy room, a good couple dozen Sister Consultants, 1 delicious lunch, 1 so-so afternoon tea (cheesecake was not the best choice), too much laughter, 1 prize won, and a total of 12 pages completed (4 PictureMyLife pages, 8 traditional pages)!

What: January Consultant Fun Day
Where: Pacific Golf
Why: to network with Sister Consultants and to get work done on my *own* projects
When: One Monday each month, 10am-10pm
How much: $20 event fee -included full handouts of the day's projects (plus $19.50 for lunch and $7.80 for afternoon tea, both from onsite restaurant)

Here's your inside look at a Consultant Only Fun Day, as seen through my experience.

The fabulous Denise Tarlinton sharing her equally fabulous project ideas and know how with us.

My set up for the day. I had stuff to do and I was gonna get.it.done. Woman on a mission! Check out these SUPER CUTE Year>>Noted stamps. Did you get your Year>>Noted kit yet?! Check it out here. Also, Sticky Boy decided to hitch a ride and keep an eye on me. Cheeky Sticky Boy!

Two of the layouts I was attempting to do after I finished some Picture My Life pages and some traditional pages. Layouts are free sketches from Scrapbook Generation's website in the free download section. The pink basket is from Daiso and it perfectly holds my Cuttlebug plates and my embossing folders, plus my pen cup, and even a few stampsets! I so need to get another one for other smaller bits and bobs.

I got these 4 Picture My Life pages done in record time yesterday. Woohoo!

Gettin' stuff done. Picture My Life pocket scrapping, lunch (highly recommend the chicken parmy), and more pocket scrapping!

We have WAAAAAAAAAAAAY too much fun at Fun Days. I don't know how we handle it. (I demand better working conditions!) We get tickets for attending, for show and tell (oh yes, we do show and tell!), for demonstrating a new technique or idea, and other shenanigans. I won a Heartstrings Complements sticker sheet! WOOHOO! I was just about to order one of these too!

Afternoon tea. The cheesecake looked good, but it just didn't taste that nice. It needed a bit of lemon in the mix or something. :/ The cuppa was excellent and even had a <3 on it.

One of my missions for the day was to complete 8 of my 21 pages that needed completing. This one finally got finished with quite a few stamps and embellishments AND journaling.

All the pages I completed yesterday. Woohoo!

Just a few of the details I used in my Picture My Life pages. I didn't have any suitable cards so I ended up blending smaller 3x4 cards with an embossed piece of 4x6 kraft cardstock. So simple and so effective.

More details of my finished page. See the slight two tone stamping on the circles? That's made by inking up my stamp with Glacier ink then lightly tapping my stamp on Slate ink before stamping on my Glacier cardstock. So easy and so delightful! I need to add some Bitty Sparkles (which have gone AWOL here in my studio, naughty sparkles!) to some of the circles before this page is really finished.

Hopscotch is so versatile. I've used it on wedding pages, on travel pages (exploring Brissie with overseas rellies), and on New Year's pages. I even used a Hopscotch 3x4 card as a journaling box! I love this limited edition range! It's only here til March 31 so get it while you can!


I call that a successful day at the office!


Wednesday, November 19, 2014

Sing Glory

Monday was our monthly Brisbane consultant fun day at The Carson Room. I had a list of things to do and I got them done! I love getting stuff done and off my to do list!
Chillin with my very own Goldilocks, the lovely Jane of Scrapping Sisters by Jane Molloy.
One of those items was 5 pages in my July-August Picture My Life album. I had my photos sorted, printed, trimmed and corners rounded in preparation for completing the pages.

I started with this template and my medium organizer full of PML cards and embellishments.
I slipped my photos in, added various Picture My Life cards, some journaling, and bits of shimmer trim or sequins where needed.
I made my own 3x4 card from a scrap of Kraft cardstock, the December stamp of the month, and a bit of shimmer trim.
I cut a 3x4 Chalk It Up card down to show just the LAUGH portion, stuck it to my photo, rounded the corners and voila.
That's 33 photos in 5 pages, and it took only about an hour (including chatting, getting second and third opinions on card choices, coffee, etc).

Stations were set around the room and we all got to try different techniques for enhancing our work. Distressing, inking, sanding, salt sanding, masking, embossing, etc. I have a really cool little booklet that's in the works and displays all the techniques. Interested? You'll have to pop in my studio for a workshop and see it!

Finally, I got down to business and started on making *my* Christmas cards for the year. I decided on 2 design themes, one Jesus and one Santa. I'm quite pleased with how they turned out!

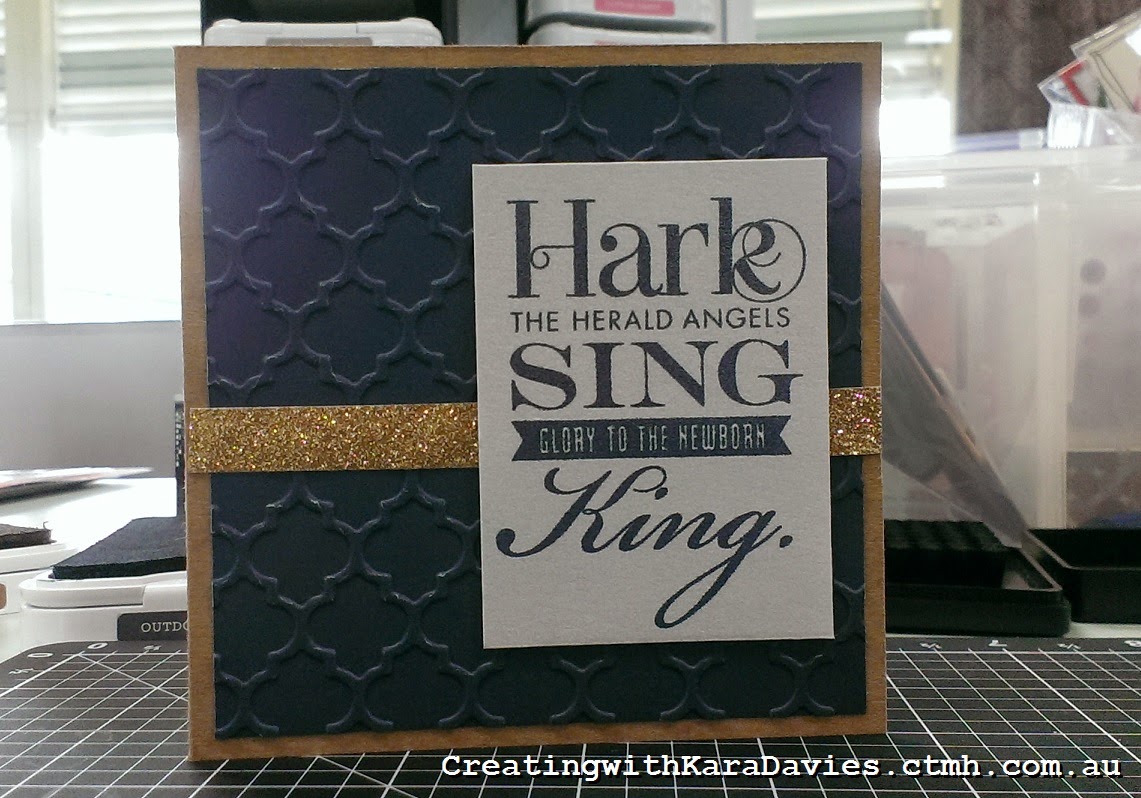
The first one is the Jesus themed card using the Sing Glory hostess reward stampset. I really like the earthy combination of kraft, outdoor denim, and colonial white, plus the sparkle of gold shimmer trim.
The only way you can get the Sing Glory stampset is by being a hostess.


Inside is stamped with Mary and Babe and Merry Christmas.
The second card is using retired papers from last year, and the October stamp of the month.
I used slate, ruby, and juniper inks to match the paper. Inside is stamped Merry Christmas.


I need to make a few more of each as my list of cards to give keeps getting longer. (Whatever shall I do?) I guess I better get back to cutting and stamping!

For a complete list of what I used to create both these cards, contact me!


Saturday, August 23, 2014

10 card swap

On Monday during Consultant Fun Day, we had a 10 card swap. Each consultant made 10 cards using something new from the Annual Inspirations book. Each consultant laid out her 10 cards on the table/stage and we took turns choosing one new card at a time until we all had 10 new cards. These are the cards I chose! At the bottom I've listed the items used to make them all.

I took a couple better shots once I got home Monday night. The creativity of my group of sister consultants is inspiring!
Your own kind of wonderful, bitty sparkles.
Pathfinding paper packet.
Yuletide paper packet, gold sequins, flaxen ink.
Chalk It Up paper packet, Happy Birds stampset.
Confetti Wishes paper packet, You Mean the World to Me stampset.
ShinHan markers.
Pathfinding paper packet, You Mean the World to Me stampset.
Trimmer. Blocks. Spritz. Scrubber. Embossing folders. Bulk Colonial White cards & envelopes. Bulk White cards & envelopes. Gold sequin assortmentAngel Policy stampset. Bonding Memories glue. Exclusive Cardstocks. Exclusive Inks. Shimmer trims.


Sunday, January 19, 2014

Full reveal

Remember that sneak peek wedding project I shared earlier? Today the bride and groom opened it and love it! :D Here's the full album. Like this project idea? Want to make your own? I can help you with that!

P&B's Wedding Mini Album


Tada! A 20 page mini album for the happy couple. Congratulations again Paul and Bianca!