Showing posts with label Look What I Made!. Show all posts

Saturday, July 18, 2015

Card Buffet 101

Wow, that was so much fun!

A big thank you to Kim, and Michelle and her bubby for coming today. I loved showing you how to make these cards!

So, if you've been following me for any length of time, you'll have seen me post and talk about my upcoming Card Buffets. You're probably wondering what exactly a card buffet is! A card buffet is a cardmaking party where you choose the cards you want to make.

These are the 8 different designs I had on the buffet today. All rather simple to make and visually stunning. Even my friend Michelle, my "I'm not really crafty" friend, made 5 cards today! All the cards in the buffet are perfect for beginners to well seasoned crafters.

When you arrive in my studio, you're greeted by me and a hot cuppa. At your place is a stamp mat, a little welcome pack, a copy of my current studio workshop schedule, a tray, and a choccie. (There's always choccies here in my studio. ALWAYS.) It's a crime to craft without chocolate in my book!

Once you're seated and have had a chance to view the buffet, you take your tray and fill it with your choice from the various precut kits. Choose up to 5 cards, and settle in for 2 hours of creative fun. That's right, everything you need to create some beautiful handmade cards is PRECUT!

As you can see here, I've made this cute little shooting star congratulations card. In the bag I've got everything needed to recreate it. By everything, I mean everything!

So what's in the bag? A card, an envelope, and all the 6 pieces of paper and cardstock, precut for your convenience. All that's left is for you to ink up some stamps, stamp the shooting star and congratulations, and assemble! So easy and fun right?

The best part of the buffet, aside from making gorgeous cards, is me! You get to pick my brain, learn new techniques, and get hands on assistance with every step of the cardmaking process.
I'm here for you! Once you've picked your cards from the buffet, it's as easy as opening the bag, stamping a few pieces, and sticking the pieces on the card front. After that, stamp the back of the card with "original artwork by" and sign your work. It really is simple to make a beautiful card with my Card Buffet. If you've never made a card before, and you've always wanted to try, come to my next Buffet!

To make it even easier, I've sorted all the stamps and inks I've used into one spot. For newbies, I even mount the stamps onto the blocks for you. You don't have to copy the card sample exactly as shown. Love the look but a different shade of blue suits your fancy? Simply ask which shades of blue I have. Like a certain card but the stamped image isn't your taste? Ask which other stamps I have that would fit that design! The card designs are so flexible that you can completely change up the elements and have a unique result.

Michelle and Kim both tucked straight in to their chosen designs while baby Charlie entertained us all with his gurgles and babbles from his playmat. About an hour in to our crafty fun, I brought out some yummy nibblies. Today's menu was rice crackers, sliced tasty cheese, sliced chicken and french onion dip. We took a few minutes to nibble and enjoy a cuppa before diving back in to the fun.

These are the three cards Kim made. I didn't get a quick snap of Michelle's 5 cards. (Oops!) I'm happy to say that the lemony card here is now sold out! In each basket at the start of each buffet is a limited number of cards (two to six), and once the design is gone, it's gone. I replenish the buffet with a new design once something disappears.

The carnage left behind after we got all crafty and inky. A good time was had by all! I cannot wait until my next buffet on August 21st.

So how much does all this fun cost? $15. That includes:
  • your place at my studio table, 
  • all the hands on help and assistance you need, 
  • up to 5 unique bespoke cards,
  • and nibblies. 
All this for $15, and you leave with at least 1 card and up to 5! 5 handmade cards for $15, plus nibblies and assistance? At an average of $3/card, that's incredible value. When you think about what you'd pay for 5 mass produced cards out in the shops, the most basic cards are easily $4-5 or more right? For $15, come on over for a fun crafternoon with new friends and leave with a pile of cards that you can say with pride "I made this"!

My next Card Buffet is on August 21st. I cannot wait to share a new mix of cards with you!
Spaces are limited to 5 per buffet. First in best dressed! Contact me today to book your spot for a fun afternoon getting crafty! Of course, I love meeting new people and sharing the fun with them too. Bring along your sister, your mum, your auntie, your best friend, your neighbor, anyone that would love to try an afternoon of crafting.

Can't wait til August 21st to buffet? Contact me for your very own private session, the cost is the same! Today's buffet was a private session.
My calendar is filling up quickly so be sure to secure your date ASAP.

Thanks for reading, it's been so much fun setting up and running this Buffet today. I can't wait to get ready for my next one!


Shop with me today!


Stay up to date with all the fun, join my community!
twitter - instagram - facebook - pinterest


Wednesday, March 18, 2015

Challenge Time!

It's time to send some happy mail!

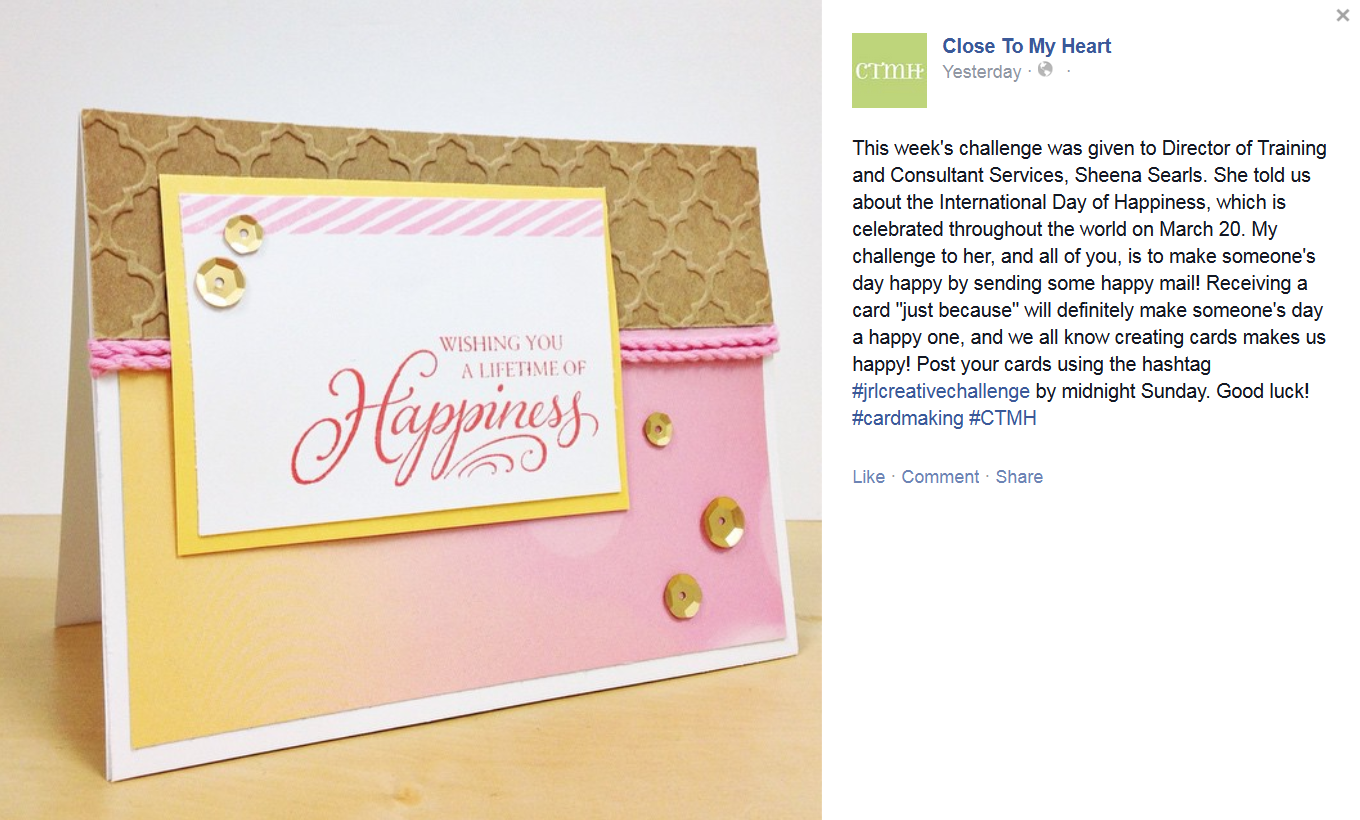
Do you follow Close to my Heart on facebook? Heaps of ideas, inspiration, contests, and challenges are on their wall. Have you seen the #jrlcreativechallenge posts lately? The newest one is to send someone some happy mail!

{source}
Challenge accepted!

I made up a quick lil "just because" card for a mate who is in the throes of her final weeks at uni.


So, brush off your pile of crafting goodies, make a card for someone, pop it in the mail, and enter the contest online. You never know, you might just win!


Sunday, March 15, 2015

Album Stats

I'm nearly finished with my albums of our trip home for 3 weeks last year. I've been plugging away at this project for several months now and it feels very good to have it almost finished!

I've used a ton of old new and current items in this project. It's mostly PictureMyLife pocket scrapbooking with a good dose of traditional 12x12 pages thrown in for good measure.
I counted up how many page protectors, page sleeves, photos, and PictureMyLife cards used and the stats are kinda redonkulously impressive. I really love these D-ring albums and how beefy they are. The rings have a nice strong bite to them and don't move once closed. I've loaded these up and they are super durable.

In the space of 2 Lagoon Chevron D-ring albums I've used no less than:

- 53 PictureMyLife memory protector page sleeves of assorted designs,
- 25 12x12 traditional page sleeves mostly top load with some side load,
- 899 photos of varying sizes (mostly 3x4 and 4x6),
- 96 3x4" PictureMyLife cards of varying designs,
- 57 4x6" PictureMyLife cards of varying designs.

Album 1:
- 26 PictureMyLife memory protector page sleeves of assorted designs,
- 13 12x12 traditional page sleeves mostly top load with some side load,
- 464 photos of varying sizes (mostly 3x4/4x6),
- 37 3x4" PictureMyLife cards of varying designs,
- 31 4x6" PictureMyLife cards of varying designs.

Album 2:
- 27 PictureMyLife memory protector page sleeves of assorted designs,
- 12 12x12 traditional page sleeves mostly top load with some side load,
- 435 photos of varying sizes (mostly 3x4/4x6),
- 59 3x4" PictureMyLife cards of varying designs,
- 26 4x6" PictureMyLife cards of varying designs.

Kinda crazy, right? ALL OF THAT fits into 2 D-ring albums with a bit of wiggle room to spare! I'm rather pleased with how much fits in each and fits securely too. Wanna see these albums up close and in action? Pop by my studio or better yet, come to the Crafty Night Out!

Spots still available, contact me asap to let me know you're coming!


Wednesday, March 4, 2015

Current projects

This month's theme is Seaside. I opened up my Seaside Paper Packet, my Reflections how to book, and my Seaside Picture My Life card decks Monday night to see what I could come up with. This is the results!
I made two double page layouts from one paper packet and 10 Picture My Life cards. No stamping whatsoever! I didn't have any of the Seaside Complements stickers to use for embellishments, so I decided to see what I could use from my Picture My Life cards. I'm very happy with how this turned out. Very quick, super easy, just a bit of cutting and sticking, plus a few corners rounded, banner tabs made, and some edges inked. That's it!


This is the first of the two layouts that I made. The design is from Reflections, patterns 4c & 8i. I used the zipstrips from 2 pieces of Seaside paper. One I used on the left page under the spots, the other I cut apart, mounted on scrap colonial white paper, inked the edges, and used as flags. There's 4 3x4 PML cards used on this layout too. So gorgeous!

This is the second layout I made. The design is Reflections patterns 4b & 7f. I used 6 PML cards between the pages and layered them. A few edges were rounded and also inked.

It really is so easy to create lovely works of art like these in minutes. The papers match the inks match the PML cards. The instructions were super simple to follow and understand. I squeezed a lot of art out of one packet of paper, and NO STAMPING NECESSARY!

Want to learn how I did these? Want to make your own? Contact me for your own Seaside scrapping escape! This is a perfect start for newbies, or a refreshing change of pace for experienced scrappers.

Products used: Seaside Paper Packet, Seaside Picture My Life kit, Paper Trimmer, Reflections how to book, Nonstick Scissors, Corner Rounder, adhesive (this or this), Bamboo and Desert Sand inks, Colonial White cardstock.


Saturday, February 7, 2015

Basket o Valentines - Tutorial

Alrighty, here's the tutorial for my Basket o Valentines!

You'll need the following materials to make the mini cards and basket:
Originals Card Confidence book, 4 sheets cardstock (similar), 3 sheets 12x12 patterned paper (I used Laughing Lola, NLA), Heart embossing folder, September 2014 SoTM - NLA, Smokey Plum ink, 2x2” My Acrylix block, SureCut™ Deluxe Craft Paper Trimmer, Versamat, Non-Stick Micro-Tip Scissors, Spritz, Scrubber, 3L® E-Z Dots® Adhesive, Bone Folder, Scoring Board, Flaxen twine, Shimmer trim, small boxed candy (like Smarties, I got mine in from Aldi)


Mini Valentines Design based on Originals page 113
To make the cards, cut patterned paper into 2.5" squares. Cut 2 sheets of cardstock into 3.5x5" bases then into 1.5x2.5" rectangles. Emboss rectangles with Heart folder. Score and fold the bases as shown.
Only cut 12 of each piece! Set aside the remaining sheets of cardstock and paper.
Using Versamat, 2x2" block, Sweet Moments image (from SoTM), and Smokey Plum ink stamp chosen image inside card. Assemble and embellish with shimmer trim as desired.
Place mini candy inside and use flaxen twine to tie shut. Trim ends with scissors.

To make the basket:
1) Using bone folder or score board, score remaining cardstock sheet at 3.5" on all sides as shown.
2) Fold all lines in to center, using bone folder to ensure crisp folds.
3) Fold the sides as shown and use adhesive to stick triangle flaps down.
4) If desired, punch 4 holes and use twine to attach a handle. Decorate using scrap pieces of patterned paper. Fill with mini Valentines and hand out.

That's all there is to it! A bit of cutting, a bit of stamping, a bit of embossing, and assembly. I hope you enjoyed making this lil basket o' Valentines! For a pdf of these instructions, contact me and I'll send you a copy.


Saturday, November 29, 2014

Thanksgiving

This year we had four guests over for Thanksgiving dinner.

This Ausmerican expat insists on celebrating 4th of July and Thanksgiving. (If we lived in the US, I'm sure my husband would insist on celebrating Australia Day and Anzac Day!)

Just for fun I made these place cards and a sign for our window. Thanksgiving is in autumn in the northern hemisphere, so this was my way of putting a little autumnal flair into our table decorations.


These were super easy to whip up. I used chocolate, honey, and colonial white cardstocks, chocolate and bamboo inks, my surecut trimmer, versamat, bone folder, nonstick scissors, quatrefoil embossing folder, 2x6.5" block, EZDots adhesive, gold polka washi tape, gold shimmer trim, Glamour upper and lowercase stampsets, swirls stampset (nla), my spritz and scrubber.


For the place cards:
- I cut my chocolate cardstock to 4x6" and folded in half to make 3x4 tent cards.
- I cut the honey cardstock to 3.75x5.75", folded it in half, unfolded and ran through my cuttlebug with the quatrefoil folder.
- I folded it in half and adhered to chocolate card with EZDots adhesive.
- I cut the colonial white cardstock to about 3.25x3".
- I stamped the swirl in bamboo ink on each white card.
- I stamped each name in chocolate ink overtop of the swirl.
- I stuck all the card pieces together and used some gold shimmer trim to up the sparkle.


For the sign:
- I used off cuts of chocolate, honey, and colonial cardstocks.
- I stamped a large swirl in bamboo ink, then Thanksgiving in Glamour uppercase alphabet in chocolate.
- I ran the honey card through my cuttlebug and stuck a turkey sticker (from my stash) on the side.
- I used a bit of shimmer trim and washi tape to finish them off.


Voila! Some quick and easy and pretty place cards for my Thanksgiving table.

The Davies - Glenn Kara Julia and Evan


Tuesday, November 25, 2014

Card Challenge

I follow quite a few different Close To My Heart consultant/artwork/networking groups on facebook. One of them has frequent posts for card challenges. I decided to bite the bullet and jump in on one for a change!

Here's the challenge sketch I worked from.
{Source}
I didn't really know what I'd make with this sketch. I fiddled with a couple different pieces until I was happy. This is what I came up with! This is a sneaky peek of brand new products coming in December so shhhhh!


All items used are from Close To My Heart: Colonial White bulk cards, Hopscotch paper packet (coming December 1st!), Colonial White cardstock, Outdoor Denim Exclusive Ink, Flaxen Exclusive Ink, Glacier Exclusive Ink, Bone Folder, Non-Stick Micro-Tip Scissors, Versamat™, Surecut™ Deluxe Craft Paper Trimmer, Sparkles Clear Assortment, Sequins Gold Assortment, 3L® E-Z Dots® Adhesive, 2" X 3 1/2" My Acrylix® Block, 3" X 3" My Acrylix® Block, Quatrefoil embossing folder, spritz, scrubber, October stamp of the month (nla), and Sing Glory hostess rewards stampset.

I'll be teaching this during my December Scrap Your Stash sessions. Please note: the Polar Bear stampset is no.longer.available. It was only available for October.. You never know what Stamp of the Month will work with future paper pack releases! Never pass up a Stamp of the Month!

What do you think? A super cute summery Australian Christmas card!


Wednesday, November 19, 2014

Sing Glory

Monday was our monthly Brisbane consultant fun day at The Carson Room. I had a list of things to do and I got them done! I love getting stuff done and off my to do list!
Chillin with my very own Goldilocks, the lovely Jane of Scrapping Sisters by Jane Molloy.
One of those items was 5 pages in my July-August Picture My Life album. I had my photos sorted, printed, trimmed and corners rounded in preparation for completing the pages.

I started with this template and my medium organizer full of PML cards and embellishments.
I slipped my photos in, added various Picture My Life cards, some journaling, and bits of shimmer trim or sequins where needed.
I made my own 3x4 card from a scrap of Kraft cardstock, the December stamp of the month, and a bit of shimmer trim.
I cut a 3x4 Chalk It Up card down to show just the LAUGH portion, stuck it to my photo, rounded the corners and voila.
That's 33 photos in 5 pages, and it took only about an hour (including chatting, getting second and third opinions on card choices, coffee, etc).

Stations were set around the room and we all got to try different techniques for enhancing our work. Distressing, inking, sanding, salt sanding, masking, embossing, etc. I have a really cool little booklet that's in the works and displays all the techniques. Interested? You'll have to pop in my studio for a workshop and see it!

Finally, I got down to business and started on making *my* Christmas cards for the year. I decided on 2 design themes, one Jesus and one Santa. I'm quite pleased with how they turned out!

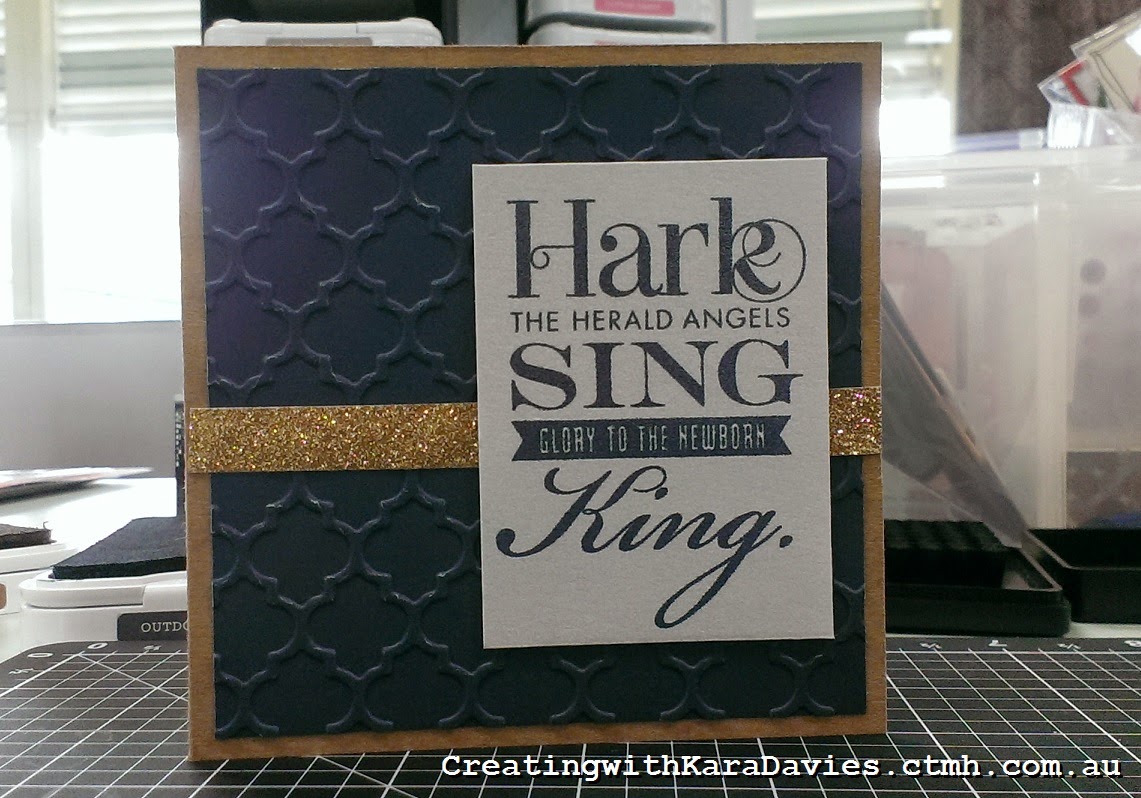
The first one is the Jesus themed card using the Sing Glory hostess reward stampset. I really like the earthy combination of kraft, outdoor denim, and colonial white, plus the sparkle of gold shimmer trim.
The only way you can get the Sing Glory stampset is by being a hostess.


Inside is stamped with Mary and Babe and Merry Christmas.
The second card is using retired papers from last year, and the October stamp of the month.
I used slate, ruby, and juniper inks to match the paper. Inside is stamped Merry Christmas.


I need to make a few more of each as my list of cards to give keeps getting longer. (Whatever shall I do?) I guess I better get back to cutting and stamping!

For a complete list of what I used to create both these cards, contact me!